How to Brief a Hardshell Tech Pack for Outdoor Brands
A strong hardshell tech pack turns an outdoor jacket concept into a set of decisions a supplier can quote, sample and reproduce. For brands developing custom hardshell jackets, the challenge is linking fabric and membrane specifications to seams, closures, fit, artwork and production approval. This guide explains what to include and how to keep the development record usable.
Make Your Hardshell Brief Ready for Review
Share your flats, intended use and material targets to discuss missing decisions before sampling.
Start With the Product Role and Version
A hardshell tech pack connects the design, materials, construction and approval record for one style. Begin with a style code, revision date, sample size, size range and named approver. Put those identifiers on every page so drawings and measurement sheets cannot quietly drift apart.
Define the intended use: hiking, trekking or mountaineering, together with the layers and equipment the wearer will use. Describe the weather role and target customer rather than relying on a general phrase such as “technical outdoor.” This gives a custom hardshell jacket manufacturer context for proposing a suitable construction.
List unresolved decisions in a visible table with an owner and due date. Mark them as open rather than allowing the supplier to interpret a blank field as permission to choose. Keep reference garments and inspiration images supplementary to the written brief.
Draw the Outside, Inside and Critical Details
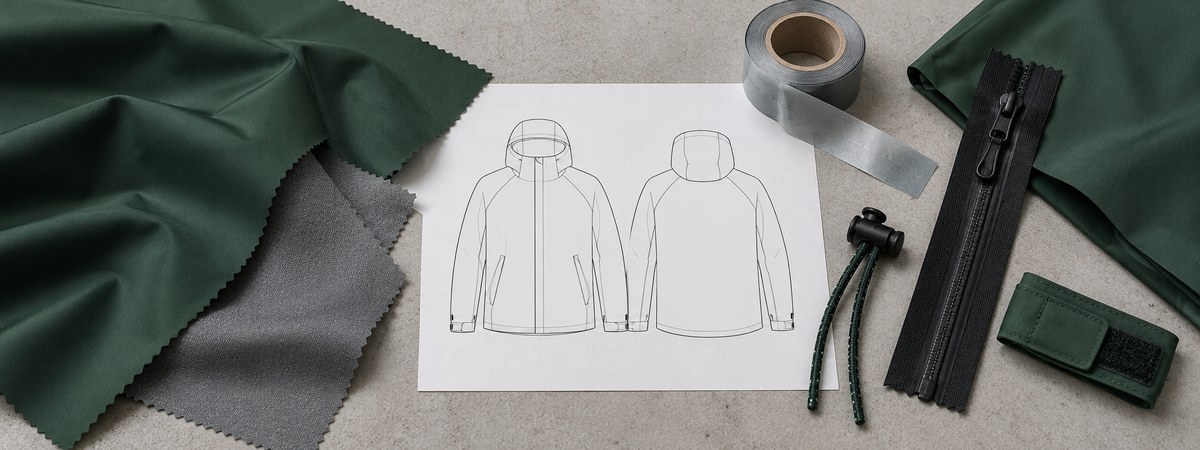
Provide front, back and interior flats, with clear detail views for the hood, front closure, pocket openings, cuffs, hem and vents. Use numbered callouts linked to construction notes and material references. A photograph can communicate appearance, but rarely establishes an inside finish or hidden assembly.
Show panel seams and identify stitched, bonded or sealed areas. Draw zipper ends, backing pieces and hood adjustments where their arrangement affects assembly. Avoid overcrowding one flat: use a separate detail sheet where the construction would otherwise be ambiguous.
For each detail, distinguish the required outcome from a construction proposal awaiting supplier input. If the factory suggests a different assembly, update the drawing after agreement. The production team should not have to reconcile a current drawing with an older instruction buried in a message thread.
Identify the Complete Fabric and Membrane System
Specify the finished laminate, not only the face fabric. Include the supplier reference, fibre composition, construction, mass and colour reference, together with the barrier and backer or inner protective finish. Record which side is the face and which is available for seam sealing.
Use the 2.5-layer and 3-layer construction guide to frame the discussion, then identify the actual proposed material. Layer count does not establish a performance rating. If a supplier proposes a replacement, review its impact on fit, sealing, care and decoration before approval.
Where a branded membrane is requested, confirm sourcing availability and the programme’s authorisation requirements. Keep brand names out of final artwork until their use is approved. Record any sustainability or chemistry claims with their scope and supporting documents rather than treating a material nickname as evidence.
Separate Performance Targets From Test Results
Give each performance requirement a method, conditions, target and sample state. Clarify whether it concerns fabric, a seam assembly or the complete garment. Hydrostatic resistance, surface wetting and moisture-transfer properties answer different questions and should occupy separate fields.
| Specification field | What to record | Approval question |
|---|---|---|
| Material identity | Supplier and finished laminate reference | Does the report match this material? |
| Water resistance | Method, target and conditioning | Fabric or assembled construction? |
| Surface finish | Finish reference and post-care requirement | How is durability evaluated? |
| Moisture transfer | Named method, units and conditions | Are competing results comparable? |
| Care | Validated garment instructions | Are fabric, tape, trims and artwork compatible? |
Label untested requirements as development targets. Attach reports when available and record their material references. Our waterproofing specifications guide explains why a millimetre figure and a DWR description cannot stand in for the whole garment.
Build a Traceable Bill of Materials
The bill of materials should identify every component needed to repeat the approved sample. Include laminate, seam tape, zippers, cord, locks, cuff tabs, labels, decoration and packaging. Assign component codes that match the drawing callouts.
For each item, record the supplier reference, colour, dimensions or size, placement and approval status. Where relevant, add quantity and unit conventions that the supplier can use for costing and ordering. Do not use one description such as “black trim” for several functionally different components.
Techpacker describes materials and measurements as distinct parts of a tech pack. Keep the material identity separate from garment dimensions, while linking them through a controlled style version. A supplier suggestion becomes the approved BOM only after the responsible buyer accepts it and the document is updated.
Specify a Seam Map and Tape Compatibility
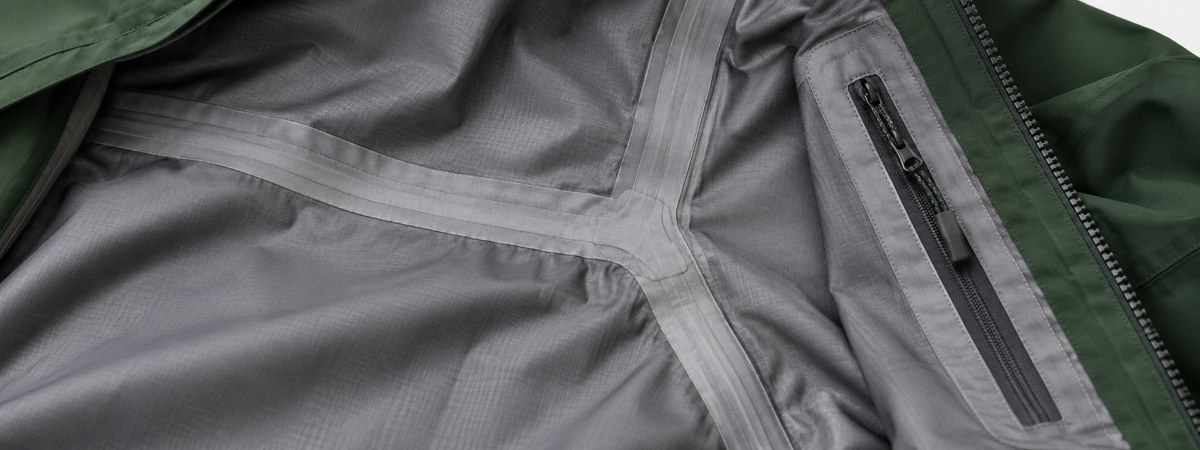
Draw a seam map showing the sealing coverage, including hood joins, sleeves, pocket constructions and intersections. Define any exceptions explicitly. “Fully taped” should lead to an inspectable construction plan rather than a photograph of a single straight seam.
Identify the tape reference and width, the laminate surface to which it bonds and the application process to be validated. Bemis states that optimal bonding conditions depend on machinery, fabrics and application and should be established before production. Copying a temperature from a different material is therefore not a complete process specification.
Agree checks for coverage, junctions, lifting and appearance, together with relevant post-care or performance verification. Record the approved process references with the sample. A change of laminate, tape or assembly should trigger review of affected approvals.
Resolve Materials and Construction Together
Review the laminate, tape, closures and approval scope as one connected package.
Describe Zippers as Installed Assemblies
Give the exact zipper reference, size, colour, length, opening type, slider arrangement and puller. Then draw its installation: zipper garage, backing, flap, seam ends and nearby sealing details. These elements influence how the closure functions on the jacket.
Use component terminology carefully. YKK describes AquaGuard products in its care guidance as water repellent rather than waterproof or watertight. Do not convert a coated appearance into a whole-garment claim. Specify which component is proposed and what the finished assembly must demonstrate.
Review operation with the intended gloves and layers. Check snagging, curvature and interaction with pockets or pack straps. Confirm care compatibility across the full assembly; an instruction suitable for one zipper does not automatically establish the care label for the laminate, tape and decoration around it.
Write Measurements, Tolerances and Movement Checks
Supply a point-of-measure diagram with unambiguous start and end points, units and garment preparation. Define whether the jacket is measured zipped, laid flat or adjusted to a stated position. Separate body measurements from finished garment measurements.
Set tolerances and grade rules for the actual block and construction instead of applying one universal tolerance to every feature. Include hood dimensions, sleeve and cuff measurements, pocket positions and relevant opening lengths. Record the layers and equipment used during fit approval.
Movement review should complement the measurement sheet. Check overhead reach, forward reach, torso rotation and hem coverage, observing collar tension and cuff retreat. The mountaineering shell feature guide provides context for pack interaction and articulation. Review representative sizes before accepting the complete graded range.

Control Artwork, Placement and Application
Provide production artwork at the required scale with its file format, colour references, dimensions and placement measurements. Include approved label wording and the relevant size or colour variants. A rendered logo on a jacket image is useful for review but does not replace a production file.
Specify the decoration method and request a compatibility trial on the proposed laminate. Transfers, print, patches and embroidery can affect the material differently through heat, pressure, adhesives or needle holes. Review inside and outside, including the relationship to tape and protective shell panels.
Approve the actual application after the agreed care or conditioning sequence. Record what was assessed and on which material. If artwork position, material or application changes later, revisit the affected approval instead of assuming the original trial covers every variation.
Run a Clear Sampling and Revision Loop
Name the purpose of each sample: construction prototype, fit revision, size review or pre-production approval. Confirm what materials and trims it uses. A substitute trim may be acceptable for a limited fit exercise, but should be identified so it is not mistaken for the bulk specification.
Consolidate comments into one dated review linked to the sample identifier. Use annotated photographs, the affected measurement or callout number, the requested change and a clear approval status. Resolve contradictory comments before returning them to the supplier.
Maintain a revision log showing the change, reason, owner and status. Ask the supplier to confirm feasibility and schedule effects. Sampling references such as 7–15 days need a defined start point and sample scope; material sourcing, custom trims and external testing may have separate dependencies.
Check Bulk Readiness Before Releasing Production
Bulk readiness means the team can identify exactly what has been approved and how production will be checked. Link the final tech pack to the approved sample, BOM, artwork, colour references and relevant reports. Resolve substitutions and open comments before release.
| Release item | Evidence to retain |
|---|---|
| Design and fit | Current flats, measurement sheet, grading and sample approval |
| Materials and trims | Approved references, colours and substitution decisions |
| Construction | Seam map, tape application references and closure details |
| Claims and care | Relevant reports, permitted wording and care approval |
| Production controls | Inspection scope, acceptance criteria and responsible approvers |
| Delivery | Quantities, packaging, dates and agreed release conditions |
Agree inspection methods and acceptance criteria with the supplier rather than inventing a universal checklist for every shell. The garment production process should preserve the connection between approved development and the production order.
Use the hardshell jacket product range to discuss a starting silhouette, then send your own versioned brief to the MontForge hardshell development team. Request price, MOQ, sample scope and timing against the same material and feature package.
Frequently Asked Questions
Is a measurement sheet a complete hardshell tech pack?
No. It also needs materials, technical flats, construction and sealing details, artwork and an approval record.
Do I need to name a membrane brand?
Not necessarily. Define the required construction and evidence, then confirm the proposed material. Brand-specific requirements need sourcing and authorisation checks.
Can I write “waterproof zipper” for every coated zipper?
No. Use the exact component supplier’s terminology and review the installed assembly separately.
Should the supplier choose the seam-taping settings?
Ask for a process established for the actual tape, laminate, machinery and assembly, with agreed validation before production.
Can production start after the first fit sample?
Only after the agreed release requirements are satisfied. Fit approval alone may leave materials, sealing, artwork, testing or sizing unresolved.
Ready to Review Your Hardshell Tech Pack?
Send the current version, colour quantities, target price and required dates for a project-specific development discussion.
Sources
- Techpacker: tech pack structure and revision records.
- Techpacker documentation: materials and measurement cards.
- Bemis: three-layer seam tape selector and application guidance.
- YKK: zipper terminology and care guidance.
- MontForge: hardshell manufacturing and sampling references.
Sources checked 27 October 2026. Confirm component guidance and project terms for the actual materials and construction.