How to Brief a Light Jacket Tech Pack
A light jacket can look simple in a campaign photograph and still require dozens of connected production decisions. The shell finish affects decoration; the lining affects zipper clearance; the fit affects pocket access. A useful light jacket tech pack turns those decisions into instructions the supplier can quote, sample and review against a shared reference.
Turn Your Jacket Design Into a Development Brief
Share your sketches, intended use and material direction to discuss the information needed for sampling.
Define the Product Before Specifying the Parts
A light jacket tech pack should connect the intended wearer to the way the garment is built. Start with the activity, season, expected layering and target silhouette. A packable wind layer, a snap-front coach jacket and a utility anorak may share suppliers, but their openings, pockets and fit requirements are different.
Choose a style reference from the windbreaker and light jacket product range, then identify what you want to retain and what you want to change. State whether a reference is for shape, hand-feel, construction or styling; a factory should not have to guess which details matter.
Give the style a unique code, revision date, owner and approval status. An early development pack can contain open decisions, provided they are labelled and assigned for resolution. It should not look production-approved while fabric, fit or artwork remains unsettled.
Use Technical Flats to Resolve Hidden Construction
Provide front and back flats, plus detail views where the construction cannot be understood from the exterior. Show pocket openings and bags, zip backing, hood adjustment, cuff finish, hem treatment and lining attachment. Photographs are useful references, but they do not replace drawings of your own design.
Number the construction callouts and use the same names in the materials list and sample comments. If the drawing calls a component “inner chest pocket,” avoid naming it “security pouch” elsewhere unless those terms are explicitly linked.
Draw the jacket both open and closed where necessary. For an anorak, show the opening below the collar and its relationship to the front pocket. For a lined coach jacket, show how the interior will be finished and where decoration access is needed.
Build a Bill of Materials the Supplier Can Quote
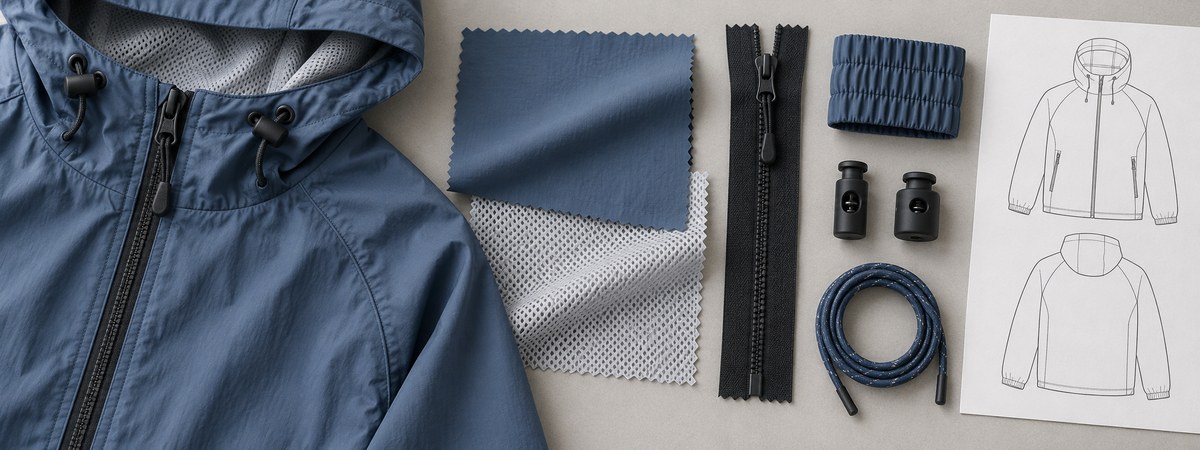
The bill of materials, or BOM, should identify each component rather than rely on appearance alone. Include shell, lining, pocket bags, reinforcement, zippers, snaps, cords, elastic, thread, labels and packaging. Use a supplier or development reference where available, and identify who is responsible for sourcing each item.
| Component | Useful specification fields | Approval reference |
|---|---|---|
| Shell and lining | Composition, weave, mass per area, finish, colour and usable width | Physical swatch or approved material reference |
| Zipper or snap | Supplier, item code, size, length, finish and colour | Approved trim card and installation sample |
| Elastic and drawcord | Material, width or diameter, finished length and colour | Sample checked in the assembled garment |
| Labels and packing | Artwork version, dimensions, material, position and pack method | Approved artwork and physical mock-up |
Keep proposed substitutions visible. “Equivalent fabric” should lead to a review of composition, surface, performance and cost, not an automatic approval. Quote against one agreed revision so two supplier offers describe the same intended jacket.
Separate Fabric Finish From Performance Claims
Write the shell specification in layers: base fabric, finish or coating, any membrane, and intended care. A note such as “waterproof nylon” leaves the construction and evidence unclear. A water-repellent finish and a waterproof garment claim need different supporting information.
If surface repellency matters, agree a method, initial target and any post-laundering requirement with the material supplier or testing provider. AATCC TM22 measures resistance to surface wetting; it does not by itself demonstrate complete garment waterproofness.
For a rain-protection brief, compare requirements with the hardshell jacket product category and address fabric, seams, closures and openings together. If you simply need a light wind layer, keep the claims proportionate to the material and garment evidence. Our windbreaker manufacturing guide explains the distinction in more detail.
Specify Zippers and Trims in Their Installed Position
Record the main zipper reference, length by size, tape colour, slider type, puller and top and bottom treatment. State whether the opening is separating or closed-end and show the intended operation on the flat. Half-zip and full-zip designs cannot be quoted as interchangeable trims.
Define the backing, guard or garage where needed. YKK’s sewing guidance recommends clearance for the slider, with particular attention to lining that could catch. The practical approval is therefore the installed zipper on the real shell, rather than an attractive loose trim sample.
For snaps, cord locks and cuff adjusters, include attachment details and the underlying fabric assembly. Check how the wearer uses them and whether they introduce bulk, pressure points or rubbing. Have the component supplier review suitability where the application is uncertain.
Create a Measurement Sheet With Clear Methods
Use a named base size and a single unit system. Give each point of measure an identifier, a drawing or written method, the target measurement and an appropriate tolerance. Define whether a dimension is a flat width, a circumference or a measurement taken along a seam.
For example, an illustrative chest entry could read: “POM C01, half chest, garment fastened and laid flat, measured at the indicated line below the armhole; target 60.0 cm, tolerance ±1.0 cm.” That describes an acceptable range of 59.0–61.0 cm for that example. It is not a universal light-jacket specification.
Choose tolerances for the design, material and manufacturing process; do not apply one margin to every dimension. Add grading rules for the size range, and check that changes in sleeve, opening and pocket position still make sense together. Techpacker’s measurement-table documentation provides a useful reference for recording targets and tolerance ranges.
Brief Fit With Layers and Movement, Not Size Labels Alone
A size name does not explain the fit. Identify the intended wearer, base layer, desired ease and reference garment where relevant. A regular jacket worn over a T-shirt can require a different pattern from a relaxed layer designed around a sweatshirt.
During fitting, fasten the jacket, reach forward, raise the arms, sit and access the pockets. Review hood visibility and collar comfort as well as body width. Photograph the same front, side and back views at each review so changes are easier to compare.
Separate measurement corrections from fit decisions. A garment can be within tolerance and still need a pattern change to achieve the intended shape. Equally, an out-of-tolerance sample should not silently become the new target. Record the decision, the new specification if approved, and which sample round must demonstrate the change.

Make Artwork Placement a Measurable Instruction
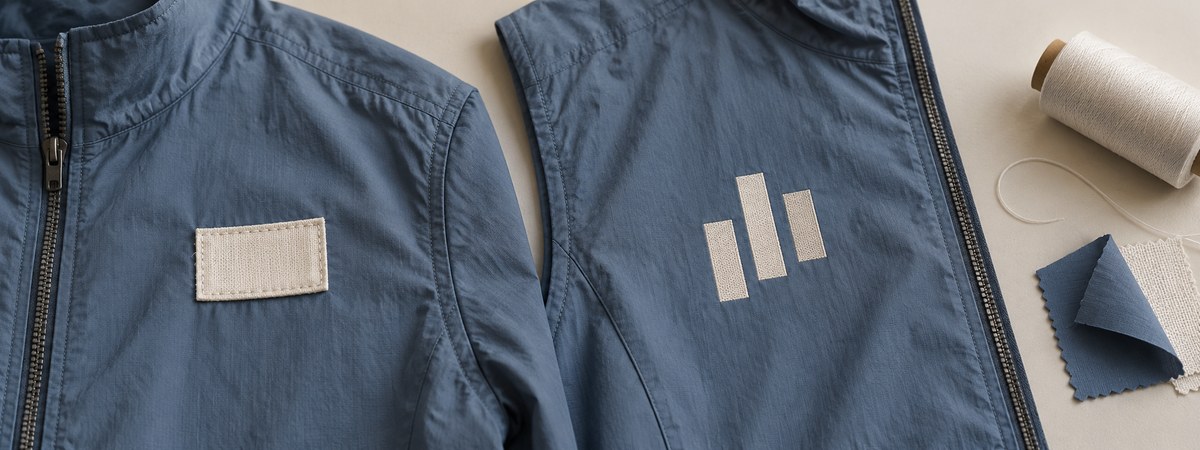
Send the final artwork file, colour references, intended decoration method and finished dimensions. Show placement from fixed pattern or garment reference points, including clearance from pocket edges, zippers and seams. “Small chest logo” does not define either size or location.
For embroidery, agree the artwork interpretation, backing, stitch design and the appearance you will approve on the actual shell. For prints or transfers, confirm the material and finish compatibility with the decorator. Review distortion, adhesion and appearance after the agreed care procedure.
Specify whether the decoration happens before assembly or on the completed garment. A lined jacket can restrict access to the chest or back panel, so resolve this before the lining is closed. Keep the approved strike-off and decorated sample linked to the artwork revision in the tech pack.
Resolve Fit and Artwork Before Bulk
Bring your sample comments and decoration references into the next development discussion.
Run Each Sample Round Against a Defined Question
Assign a purpose to each sample: initial shape and construction, fit correction, decoration approval or a production-intent review. Not every project uses the same sequence, but each round should have an agreed scope and a clear record of what remains provisional.
A useful comment has four parts: observation, intended correction, affected specification and the evidence needed next. For example: “The pocket opening is difficult to reach when seated. Review the angle shown in detail P02; submit the revised pattern and a sample demonstrating seated access.” Avoid comments such as “make it more premium,” which cannot be verified.
Consolidate feedback into one dated revision with a named approver. Mark superseded files and ask the supplier to acknowledge the revision they will build. If cost or availability causes a substitution, review its effect on fit, construction, care and decoration before closing the change.
Use Approval Gates Before Releasing Bulk Production
The transition from a good-looking sample to a controlled order depends on approvals. Review the garment production process with the supplier and identify what must be fixed before fabric commitment, cutting and final shipment. Different projects may require different gates.
| Release area | Evidence to have ready | If still open |
|---|---|---|
| Fabric and trims | Approved material references, colour and component specifications | Keep the affected purchase or substitution decision pending |
| Fit and size range | Approved measurements, grading and relevant size samples | Resolve the affected pattern or size decision |
| Construction and artwork | Production-intent sample and approved decoration | Recheck the affected process or placement |
| Quality and packing | Agreed inspection criteria, care information and packing references | Close the missing instruction before the relevant operation |
Agree how inline and final checks will be recorded. Keep aesthetic approval, dimensional acceptance and performance evidence distinct so one signed photograph is not treated as approval of everything.
Send a Quote-Ready Pack With a Short Handoff Note
Your handoff should state the style code, current revision, quantity by colour and size, target delivery requirement, sample scope and the decisions needing supplier input. Include the technical pack and references in a clearly organised set rather than leave instructions scattered across messages.
For custom light jacket manufacturing, ask the supplier to confirm material availability, assumptions, exclusions and proposed development milestones. Request an itemised explanation of costs where special trims, decoration trials or testing affect the quotation.
When working with MontForge, use the light jacket product collection to discuss a comparable construction direction, then request confirmation for your own brief. Public sampling or MOQ references are starting points; the actual order conditions and schedule should be confirmed for the approved specification.
Frequently Asked Questions
Is a measurement sheet enough for a light jacket?
Usually it leaves important decisions open. Include construction drawings, materials, trims, artwork and revision control so the measurements relate to an identifiable product.
Do I need every material decided before asking for help?
No. Mark open decisions clearly and provide the intended feel, use and cost priorities. Ask the supplier to propose options for approval rather than treating an unspecified material as final.
What tolerance should I use?
Set tolerance by measurement point, material, design and process. A single example or another brand’s chart should not become a universal rule for your jacket.
Can I approve fit from measurements alone?
Measurements are necessary, but review the garment on the intended wearer or suitable fit model with the planned layers and movement checks.
When should artwork be tested?
Before bulk decoration, on the intended shell and finish with the proposed process. Plan the trial early enough to change the method or placement if needed.
What happens if the supplier changes a component?
Record the substitution, review the affected areas and approve the revised reference before use. Update the tech pack and approval record together.
Ready to Brief Your Light Jacket?
Send your current tech pack, artwork and quantity by colour and size to discuss development, sampling and a project quotation.
Sources
- Techpacker: tech-pack structure and revision documentation.
- Techpacker Help Center: measurement tables and tolerances.
- YKK: zipper sewing and slider-clearance guidance.
- AATCC TM22: published scope for surface water repellency testing.
- MontForge: light jacket development and manufacturing information.
Sources checked 20 October 2026.